About Deep Zoom
The zoomable maps ad images on this web site (and the Library of Congress) use a technology called Deep Zoom. If you understand paths on your web site (i.e., you understand the folders and subfolders on your website), you can put your own Deep Zoom maps and images on your site. The instructions below use open source programs and only require that your site allows javascript.
- Download and install OpenSeadragon. While on the OpenSeadragon site, be sure to check the links for instructions and examples of OpenSeadragon in the Wild. For inspiration, or just to view a large collection of maps, I recommend The David Rumsey Map Collection.
- After you have downloaded and extracted the OpenSeadragon package, move or copy the openseadragon folder to your local web folder (usually wwwroot or wamp64/www on Windows computers). I removed the version number from the folder so I just have a folder called openseadragon in my web folder. You will need to upload this folder to your web host when you go live.
- Download and install a program to prepare your image. Refer to the OpenSeadragon Creating Zooming Images page. I use the DZI format and Deep Zoom Composer which requires Windows and has been discontinued.
- Prepare your raw image if you do not yet have one. I scanned the maps on this site at 300 dpi to tif format. The atlas was larger than my scanner bed, so I had to stitch several scans together. For example, the map of Center Township 1922 required 6 scans. Photoshop does a nice job of stitching the images together. Search for help on Photomerge for your version of PhotoShop. My map of Center Township is about 5000 x 5000 pixels.
- Create the zooming images. These are the basic steps using Deep Zoom Composer.
- Open Deep Zoom Composer and start a new project.
- Add your image (or multiple images) to the project using the "Add image…" button in the right pane.
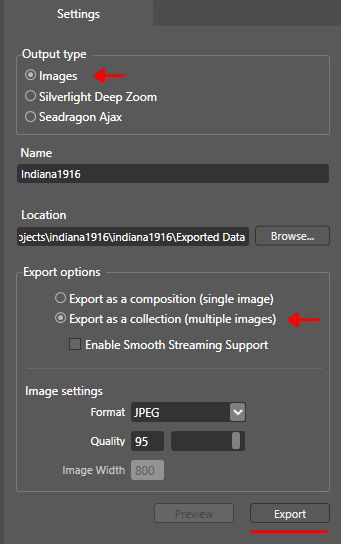
- Export as images, provide a name, and select 'Export as a collection (multiple images)'. I did not enable smooth streaming support. Here is a screenshot.
- I skip the Compose step and just create links to the individual maps on an index page.
- Copy your image folders and xml files to your web site folder. You should have one folder and one xml file for each image in your project. Following the instructions above with a default installation of Deep Zoom Composer on a Windows 7 computer the path to my image folders was "Documents\Expression\Deep Zoom Composer Projects\UntitledProject2\Exported Data\tutorial\dzc_output_images" where the project name was UntitledProject2 and I had provided the name 'tutorial' when exporting the images. The dzc_output_images folder contains a folder and an xml file for each raw image that you imported into the project. Copy the dzc_output_images folder to your web folder and rename it if you like. Do NOT rename the xml file or the folder within the dzc_output_images folder. Deep Zoom Composers dices the raw image into small pieces that can be put back together by the OpenSeadragon script. My 5000 x 5000 pixel map of Center township resulted in a folder that contained over 500 files in 14 folders named 0 through 13.
- Create an html page to display the map or image. I put this file in the dzc_output_images folder that I have copied to my web directory and renamed to something that reflects the content. I include a script line in the head of my html page with the path to the OpenSeadragon library on my site.
<script src="../openseadragon/openseadragon.min.js"></script> - This is the minimum code I use inside the body element of my page. Note that this html file is in the same folder as the xml file and the folder with many subfolders of image tiles that I DO NOT rename.
<div id="zoom-display"></div>
<script>
    myDragon = OpenSeadragon({
        id: 'zoom-display',
        prefixUrl: '../openseadragon/images/',
        tileSources: 'tutorial.xml',
        showRotationControl: true,
        autoHideControls: false,
    });
</script>